Of Grain and Grain  |  Tactile Explorations of Flour and Wood

By Ashley Look

  • Blog
  • Flour
  • Wood
  • Shop
  • Services
  • Events
  • About
  • Contact
  • Search
1 Bowl Banana-chocolate chip mini muffin recipe from for the Full Moon Baking Club.

1 Bowl Banana-chocolate chip mini muffin recipe from for the Full Moon Baking Club.

October 2019: 1 Bowl Banana-Chocolate Chip Mini Muffins

October 13, 2019 by Ashley Look in Full Moon Baking Club, Recipes

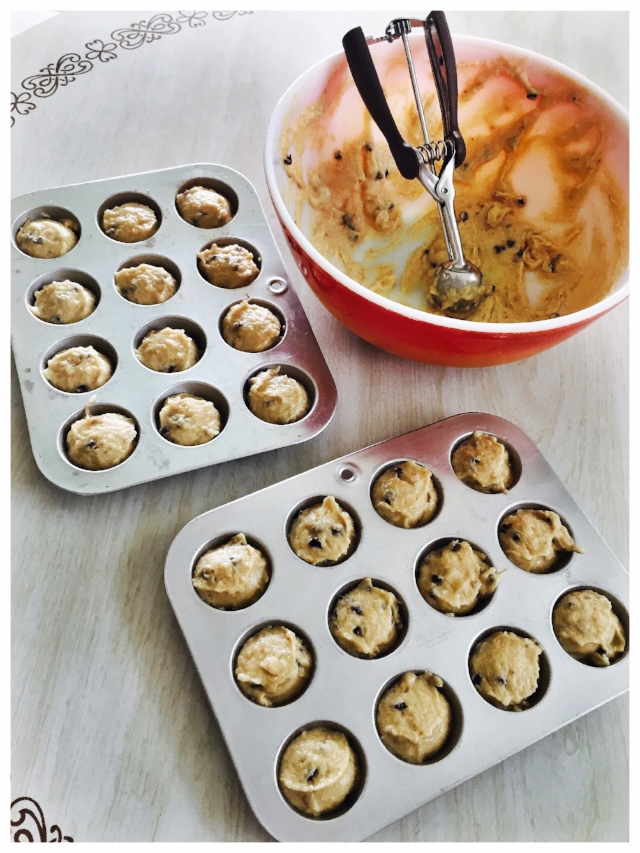
These banana-chocolate chip mini muffins are a game changer for senior eating! Mini anything is always enticing but these muffins are made in a single bowl making caregiver clean-up a breeze. They are sure to win over everyone thanks to chocolate chips. Kids too! And with some sneaky ingredients for extra nutrition, what’s not to love? They are mini but mighty, which seems like an important details when it comes to muffins.
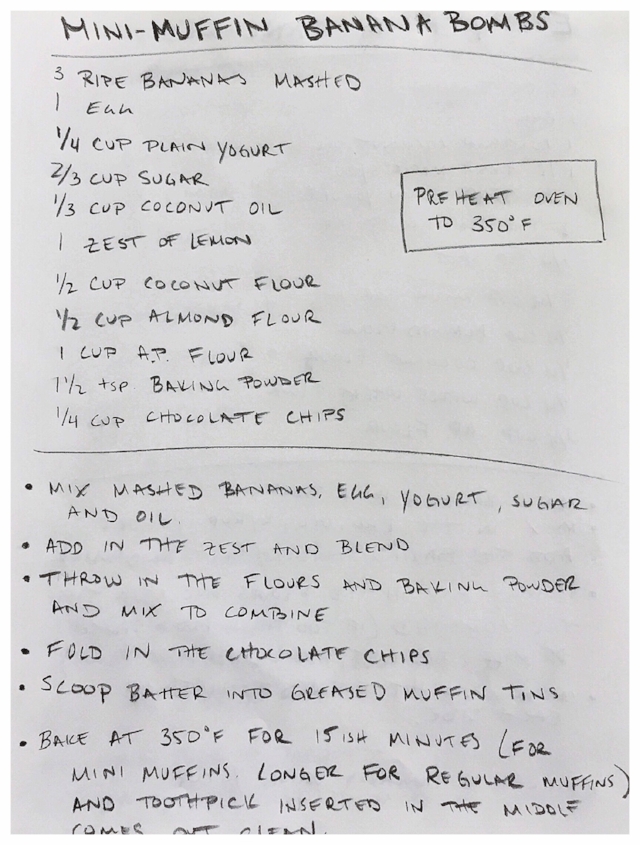
mini muffin prep.jpg
mini muffin recipe.jpg

Ingredients

  • 3 ripe bananas mashed
  • 1 egg
  • 1/4 cup plain yogurt
  • 2/3 cup sugar
  • 1/3 cup coconut oil
  • zest on 1 lemon
  • 1/2 cup coconut flour
  • 1/2 cup almond flour
  • 1 cup all-purpose flour
  • 1 1/2 tsp baking powder
  • 1/4 cup chocolate chips

Directions

  1. Preheat oven to 350 degrees F.
  2. In a large bowl mix the mashed bananas, egg, yogurt sugar and oil.
  3. Throw in the flours and baking powder and mix until it's well combined.
  4. Fold in the chocolate chips (I used mini chips however regular size will work just fine).
  5. Scoop batter into well greased muffin tins.
  6. Bake at 350 degrees F for 15ish minutes or until a toothpick comes out clean from a center muffin. (If using tradional sized muffin tins they will likely take longer to cook. Just keep a watchful eye while baking.)
A mini but mighty muffin recipe with banana and chocolate chips.

A mini but mighty muffin recipe with banana and chocolate chips.

Make and bake! And then tell me what you think, especially how many is too many, cause, ugh… I’m asking for a friend? Hehehehe…

October 13, 2019 /Ashley Look
How to feed a senior, 1 bowl Banana Chocolate Chip Mini Muffins, mini muffins, banana, chocolate chips, caregivers, single bowl baking, mighty muffins, Full Moon Baking Club, full moon ceremony, nutrition, bananas, yogurt, coconut flour, almond flour
Full Moon Baking Club, Recipes
Comment
Bulk fermenting my baguette starter. The feet really give it scale don’t you think?

Bulk fermenting my baguette starter. The feet really give it scale don’t you think?

September 2019: Basic Baguette Bread Recipe

September 14, 2019 by Ashley Look in Full Moon Baking Club

Baguettes can be tricky but I’m here to tell you to forget goals of perfection and just get on with yo’ baking selves. There is no reason to let authenticity keep you from making things. I believe it’s far better to fumble through something with decent success than to avoid it all together and be dependent. Perfection often stands in the way of progress. Just try and and you’ll find yourself well on the way to becoming a more competent human. Yes, still far from perfect but more capable and self-reliant which seems like a good first step toward reducing your personal footprint and living a more sustainable lifestyle.

You’re shocked right? Who knew you could get so eco-friendly from baking baguette? Hey, you gotta start somewhere. And if you’re not convinced on the lifestyle, maybe you’ll be inspired by convenience. The great things about have baguettes in your life (besides crostinis) is the easy in feeding a crowd. I got two words for you: Sub and Sandwiches…

This baguette recipe was perfect for shaping long, beautiful loaves.

This baguette recipe was perfect for shaping long, beautiful loaves.

Ingredients:

  • 3 cups flour (extra for dusting your surface and as necessary)
  • 1/4 tsp. active dry yeast
  • 1 tsp. salt
  • 1 1/2 cups warm water

Directions:

Phase 1

  1. In a large bowl mix the flour, salt, and yeast together.
  2. Add the warm water and mix to form a shaggy dough ball.
  3. Cover with plastic wrap and let rest 8 to 12 hours or overnight in a cool environment like a basement. (You can place it in your fridge, but remove it and let it come to room temperature for a few hours before starting the next phase.)

Phase 2

  1. Remove the plastic wrap and carefully dump the dough out onto a floured surface.
  2. Divide the dough in half and gently work one piece at a time into a long 16 inch length baguette loaf. (For shaping tips click here.
  3. Place on an oiled baking sheet and cover with plastic wrap and let rise for about 30 minutes.
  4. Repeat the process with the second piece of dough.

Phase 3

  1. Place a small bread pan with an inch of water in the oven and preheat it to 450 degrees F. (The pan of water will help create a crispy crust that you want for the exterior of your baguettes. You can read about creating crispy crusts at home by clicking here.)
  2. When the oven is ready, remove the plastic wrap, score the tops of your baguettes and place the baking sheet with the loaves in the oven and bake for 15 minutes.
  3. After 15 minutes, carefully remove the pan of water from the oven and continue baking for another 10 to 15 more minutes until the crust is a golden brown.
  4. Carefully remove the baguettes from the baking sheet and let them cool on a wire rack before cutting into them.
Subs.jpg Sub sandwich.jpg

And now that you have your baguettes you can make epic sub sandwiches! Perhaps it was grow-up experiencing Subway’s party sub at childhood birthday parties but I’ve forever thought the execution wicked long sandwiches was brilliant for crowd feeding. Just cut it lengthwise and top it with the goody of your choice and then slice and serve to the masses. It’s seriously easy. I made this falafel version for a group of 25 starving sailors the other day and rejoiced in the easy labor of it all. Would I make 25 individual sandwiches for them? Heck no! Ain’t nobody got time for that! Work smarter not harder folks… You need this recipe in your back pocket.

Enjoy the full moon! Its the weekend. Go bake!

September 14, 2019 /Ashley Look
How to feed a senior, Full Moon Baking Club, full moon ceremony, breaking bread, bread recipe, baguette recipe, sub sandwiches, grinders, flour, salt, yeast, home kitchen, home baker, homemade bread, handmade bread
Full Moon Baking Club
Comment
Homemade sliced Anadama Bread.jpg

August 2019: Anadama Bread

August 15, 2019 by Ashley Look in Full Moon Baking Club, Recipes

Hey Moon Bakers,

As you read this I’m settling into Rockland, ME with the Sea Education Association where I’m cooking for the crew of the Corwith Cramer for the next couple of months. I’m beyond excited to be back with this organization after a five year caregiving break and I’m equally excited to be back in New England where my bread making journey began. Anadama Bread seems a fitting recipe for adventuring back to the north. It’s legendary in these parts and if you’re curious on why, you can click here. The recipe below is slightly less traditional substituting a couple table spoons of honey for some of the molasses but really, it’s all about course corn meal. By soaking the cornmeal overnight and creating a sponge to help with fermentation, this bread produces a light crumb that’s full of texture. It also makes for quite a large loaf. You’ll have sandwich bread for days so you better plan a picnic and invite some friends!

soaker.jpg starter.jpg sponge.jpg pre mix.jpg mixing dough.jpg dough coming together.jpg covered and at rest.jpg first rise.jpg ready for second kneading.JPG Shaped loaf in pan.JPG Anadama Bread.jpg

Ingredients:

Soaker

  • 1/2 cup coarse corn meal

  • 1/2 cup warm water

Sponge

  • 1 cup flour

  • 1 1/2 tsp active dry yeast

  • 1/2 cup warm water

  • Plus the soaker

Dough

  • 1 1/4cup flour

  • 3/4 tsp salt

  • 2 tbsp honey

  • 1 tbsp molasses

  • 1 tbsp softened butter

Directions:

  1. Make the "soaker" by mixing the corn meal and water in a small bowl and rest covered for 6 to 8 hours or overnight.

  2. Transfer the soaker to a large bowl and add all the other "sponge" ingredients and mix well.

  3. Cover with plastic wrap and let rest for an hour or until bubbles begin to form.

  4. Add all the "dough" ingredients to the sponge and mix to combine.

  5. Work the dough and help it form a rough ball then transfer onto a floured counter top.

  6. Begin to knead the dough adding more flour as necessary to keep the dough from sticking.

  7. Knead consistantly for 15 to 20 minutes until all the ingredients are well combined and the dough is soft and pliable. (This dough has a tendancy to be dense so it's important to knead it thoroughly to produce a light and airy finish.)

  8. Once the dough is well formed, placed it in large bowl that’s been greased and then cover and let rise at room temperature for 60 to 90 minutes or until double in size.

  9. Remove the dough to a counter and reknead adding additional flour if necessary as you degass any trapped air bubbles.

  1. Gently shape the dough into a loaf shape and place into a greased loaf pan and then cover again and let rest for another hour.

  2. Preheat the oven to 350 degrees F.

  3. Once the dough has doubled in size, place it in the oven and bake for 20 minutes.

  4. Rotate the pan and continue baking for another 25 minutes.

  5. Carefully remove the bread from the oven and turn out the loaf onto a wire cooling rack.

  6. Let cool before slicing. (I know this part is hard but the bread is so light and fluffy inside that you risk tearing it if you don't wait.)

sliced in hand.jpg

Do you like Anadama Bread? I’d love to hear your thoughts!

August 15, 2019 /Ashley Look
How to feed a senior, Full Moon Baking Club, Anadama Bread, August 2019, baking bread, bread recipe, breaking bread, Anadama recipe, homemade bread, handmade bread, home kitchen, home baker, monthly baking recipe, full moon ceremony, corn meal, molasses, New England, Maine, Sea Education Association, flour, yeast
Full Moon Baking Club, Recipes
 
Search